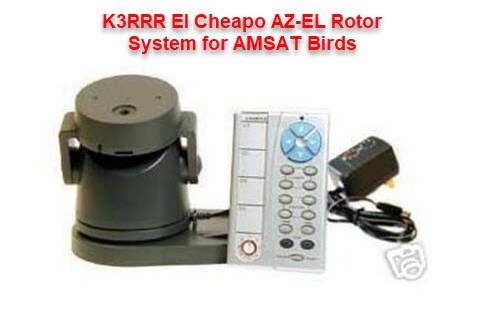
The K3RRR El Cheapo AZ-EL Rotor System
for AMSAT Satellites
(Note: this was the ham radio satellite antenna system that I used when we lived at one of our Gulf of Mexico beachfront condos a few years ago. The good thing is that you can still get parts!)
I have had many requests for show and tell about my under $50 approach for my K3RRR El Cheapo AZ-EL rotor system for working the LEO (low earth orbit) AMSAT birds.
Note: If you have a couple of hundred dollars to spend on your rotator system instead of just $50, I highly recommend you take a look at my Computer Controlled Attic Antenna System – this works even better on balconies and backyards also – and it is much more durable than El Cheapo AND computer-controlled!
Bigger Is NOT Better – At Least In This Case!
Once upon a time, in the big house, I had the complete set up with dual, switchable circularly-polorarized yagis with mast mounted pre-amps and the Yaesu G-5400 computer controlled rotor….which all worked great for every AMSAT bird that passed my way! However, now that I am a cliff dweller on the 10th floor of a high rise condo …and even though the balcony is big…the old antenna array approach for satellites is NOT an option. Especially with the CCR police!
[Here’s a video of Art, WA1GOV, making AO-91 satellite contacts using my El Cheapo AZ-EL Rotor System for AMSAT Birds from the back of his truck. I wrote this web page about using this system on my balcony. Art took it mobile!]
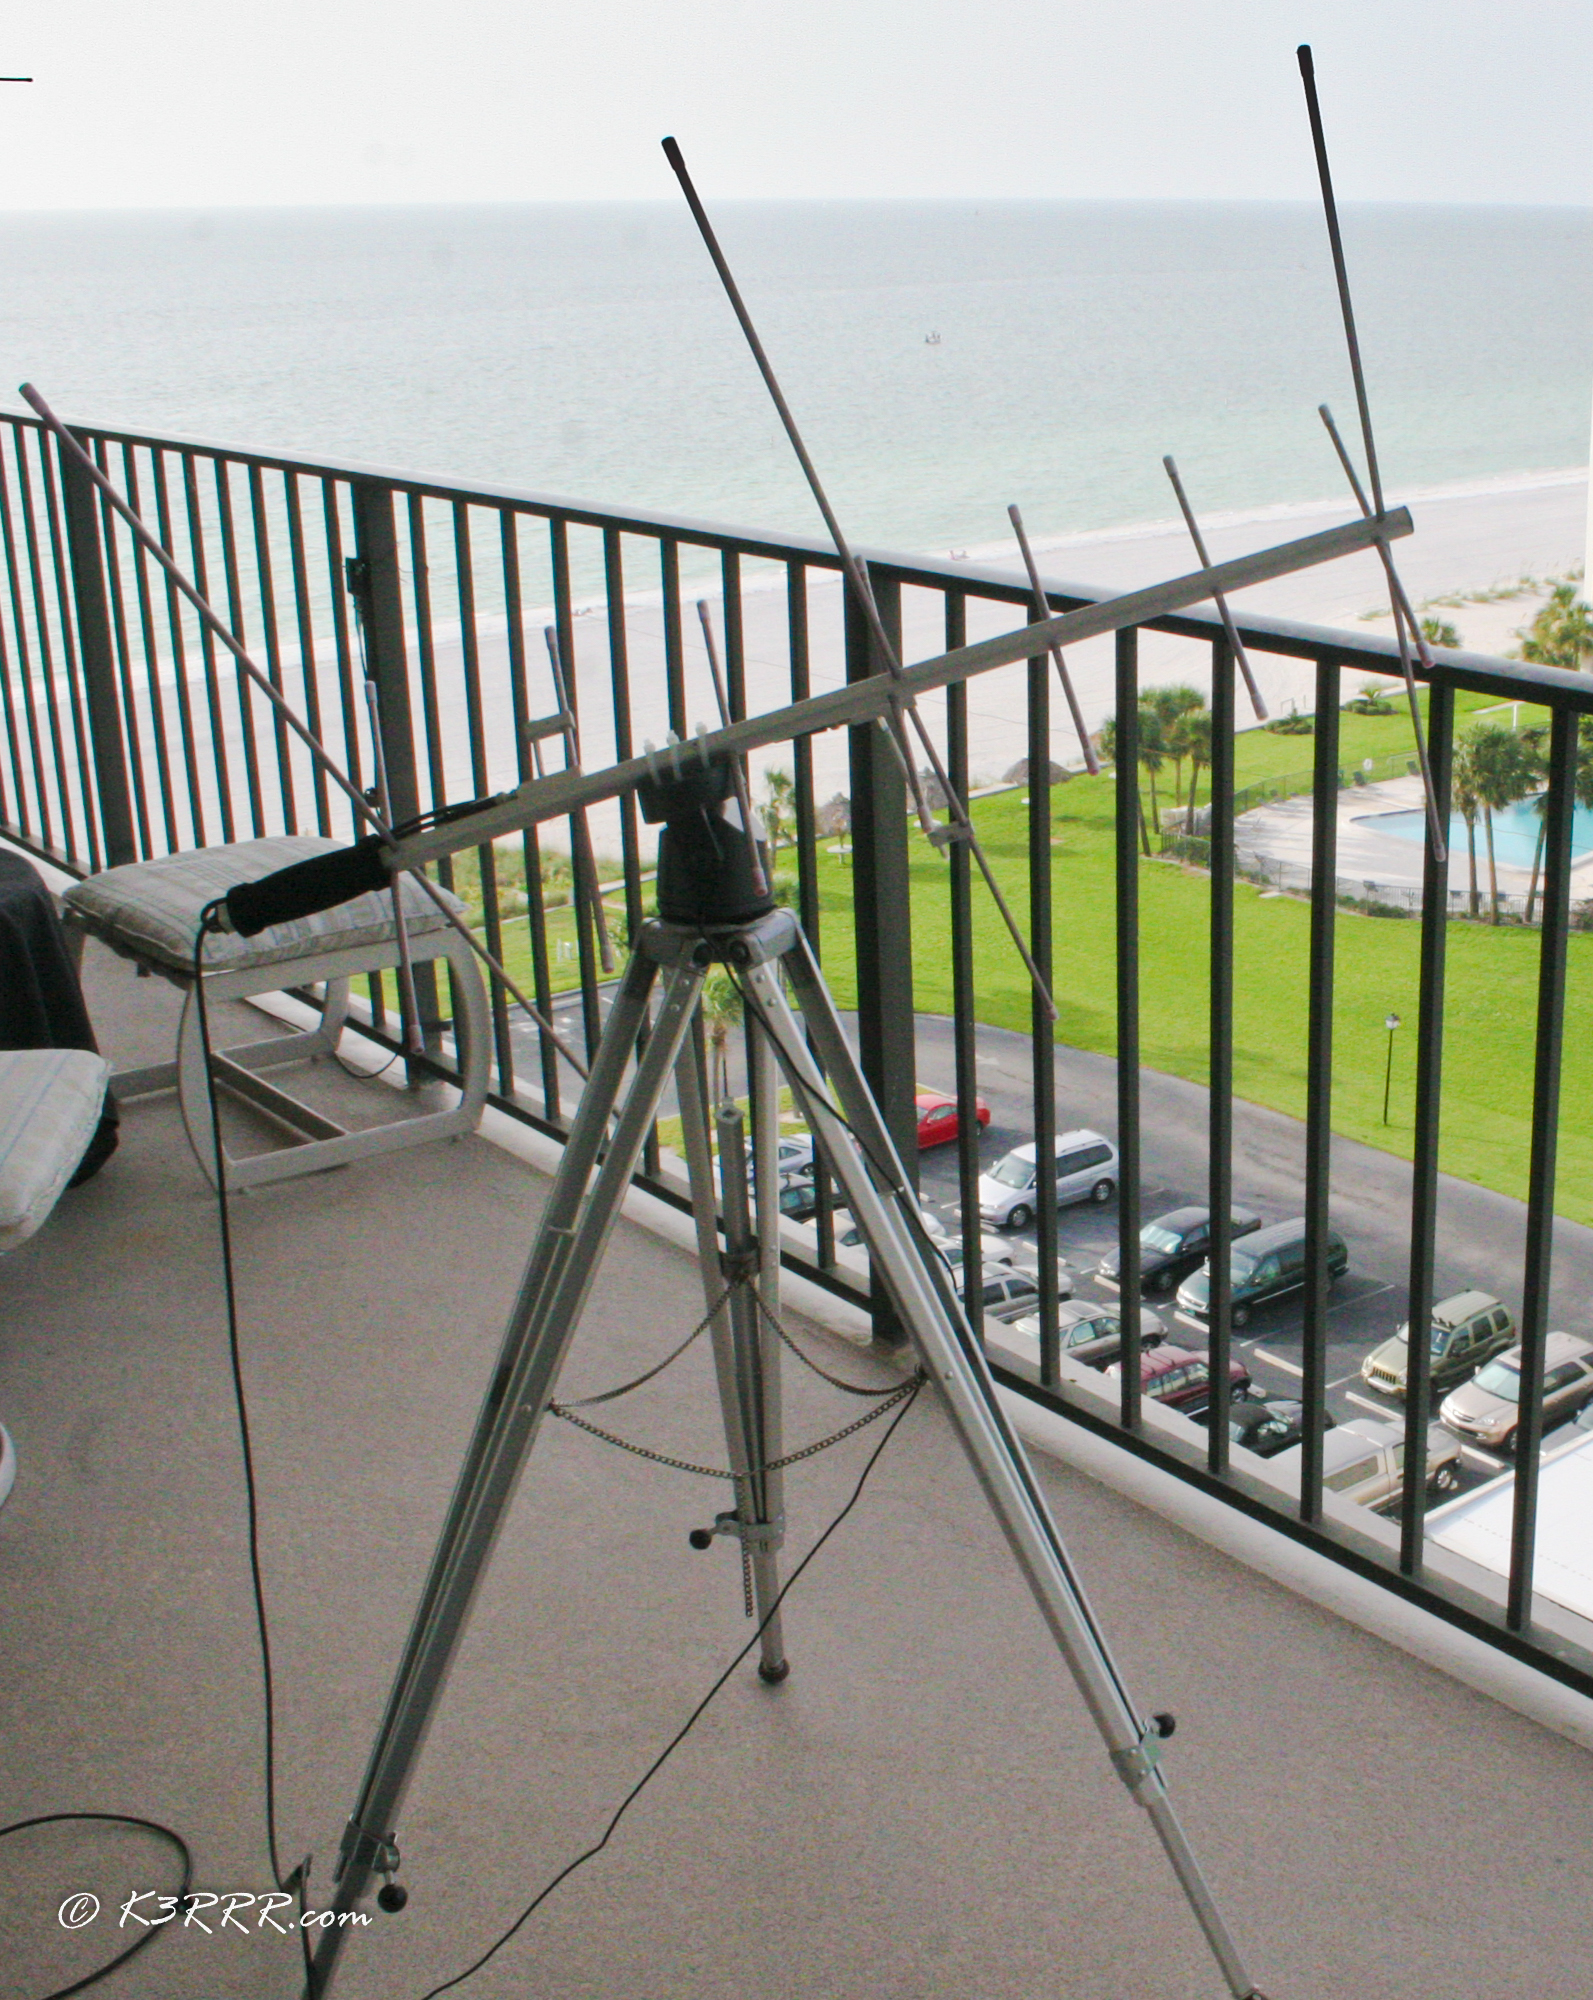
However, there is still a reasonable option: the Arrow II Satellite antenna. I have the 146/437-10WBP model which includes the 10 Watt duplexer and cost about $140.
It is designed to be handheld which works surprisingly well…it’s fun to sit on the beach with a FT-817 and the handheld Arrow and be able to communicate all over the States, Central America and the Caribbean (a typical, full LEO footprint) with a couple of watts on UHF/VHF. (It also works very well for standard UHF/VHF repeater stuff too.)
The manufacturer doesn’t say what the gain is…probably because it can’t be a lot since it only has a 38″ boom. Also, the antenna is linearly polarized instead of circular. This is mostly OK for the LEOs since many of them are also linear.
Again, remember this is designed to be a handheld antenna and isn’t meant to compete with full size satellite antennae.
Besides operating portable, I also wanted a way to work the birds from my balcony AND still be in the comfort of my shack with access to my tracking software.
After searching for a replacement to my Yaesu G5400 rotor, both the sizes and the prices convinced me that there had to be a better way to turn a 19 ounce, 37.5″ long antenna (BTW, it is a law of physics that if you hand-hold a 19 ounce antenna long enough, it appears to very quickly feel like 19 pounds!…but I digress.)
Besides the limitation of a 9 foot high ceiling on the balcony, I also had the major constraint of only being able to turn the antenna through 180 degrees instead of the full 360 degrees since I have a twelve story building in the way of line of sight to the birds for half of the 360 degrees (more about that later.)
A Cheap Solution
The dilemma was solved with the following components:
- A Ninja Pan ‘n Tilt, an X10 video camera mount and controller that allows you to easily move a camera from left to right, and up to down. With the included NINJA ScanPad Remote, you can remotely move the position of the camera to monitor whatever you want. With its Ultra Sweep & Scan™ feature you can put your camera on auto-pilot to sweep between 4 preset locations. (Commercial over.) Details about this gizmo can be found by clicking this Amazon Link. You can download the manual by clicking Manual. Click Power Source for info on the 12v 200 ma XM14A Power Supply.
- Their price is about $100 for the pan and tilt and the remote control. However, and this is the kewl part: I found a brand new one on eBay for $20! (I just checked and see one today for $49.) With shipping, I paid $35.
The system has some pretty severe limitations:
- It can’t tolerate much wind even though a 19 oz antenna doesn’t produce a lot of wind load. However, I have had the above in near constant use for the past eighteen months with very little problem (the gale force winds we often get here can sometimes be enough to knock over the antenna and tripod…so I now strap the legs of the tripod to the balcony railing.)
- It will only cover about 200 degrees of azimuth.
- It will only give an elevation of about 60 degrees. (It also does 60 degrees below the horizon but this is of little use with the birds!)
- You have to have access to A/C for the rotor’s WART in order for the remote control to work. However, a nice feature is that the cord from the WART has a standard stereo mini plug for it to attach to the pan and tilt. In my case, even
 though I have A/C on my balcony, I chose to plug the WART in a strip in the shack and used a 20′ Radio Shack speaker extension cable between the WART and the rotor. This allows me to keep the WART out of the weather and puts it closer to the remote.
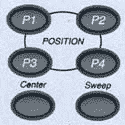
 - Line of sight is always a good thing when working the AMSAT birds…I am not only talking antenna to satellite but also eyeball to antenna so you can figure out where the damn thing is pointed! If you are a cliff dweller, your antenna system is probably going to be like mine – out on the balcony and hopefully within sight of your operating position. Even if you can’t see the antenna, the remote has four position settings that are easily programmed. For me, I program P1 as the west end of the balcony, P2 as the perpendicular from the balcony and P3 as pointing at the east end of the balcony. P4 is due north at 30 degrees elevation. By doing something similar, you can use this approach even if the antenna is “outta sight” or you can’t see it at night.

- The good news comes from the bad news of being a cliff dweller: you can’t use more than about 200 degrees of azimuth and 60 degrees of elevation is all you need with the limited directivity of this small beam. I wasn’t sure if all of this would work but was willing to gamble $35 to find out!
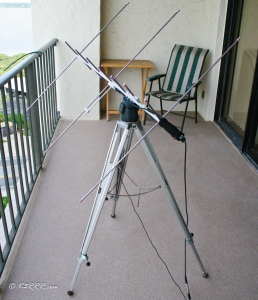
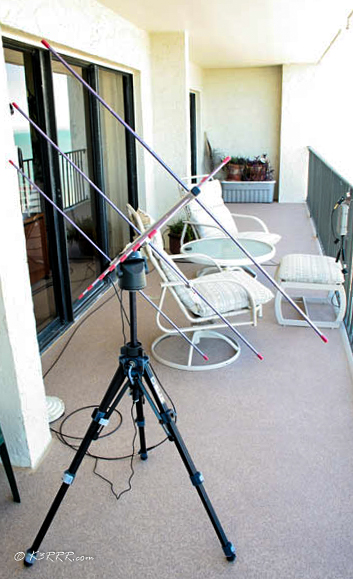
- A tripod as a “tower”. The Ninja has a standard tripod mount on the bottom so any tripod will work. At a recent hamfest, my wife spotted some used tripods for sale and I picked up the one you see in the above photos for $10. I removed the pan and tilt head that came with the tripod (the Arrow II has a hole drilled and tapped that fits a standard tripod too. Before I came up with the rotor system, I used the straight tripod approach when using the antenna with my radio on the balcony.)
- As you can see in the pictures, neither the 144 or the 440 elements are vertical or horizontal on the dual band yagi. This is due to tripod clearance issues at high elevation settings when working the satellites. This could be solved by cranking up the tripod shaft much higher…but by keeping the height below the metal railing, I am able to keep the antenna out of sight of the CCR police!
- (I know there is a 20 or 30 db loss between horizontal and vertical when cross-polarized. But what is the loss when you are at 45 degrees? Inquiring hams want to know! Actually, one of our readers, Dr. Jerry Johnson – K0CQ, has given us the answer. See below.)
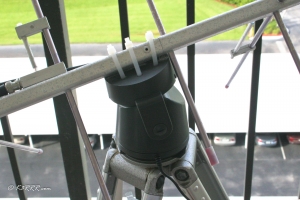
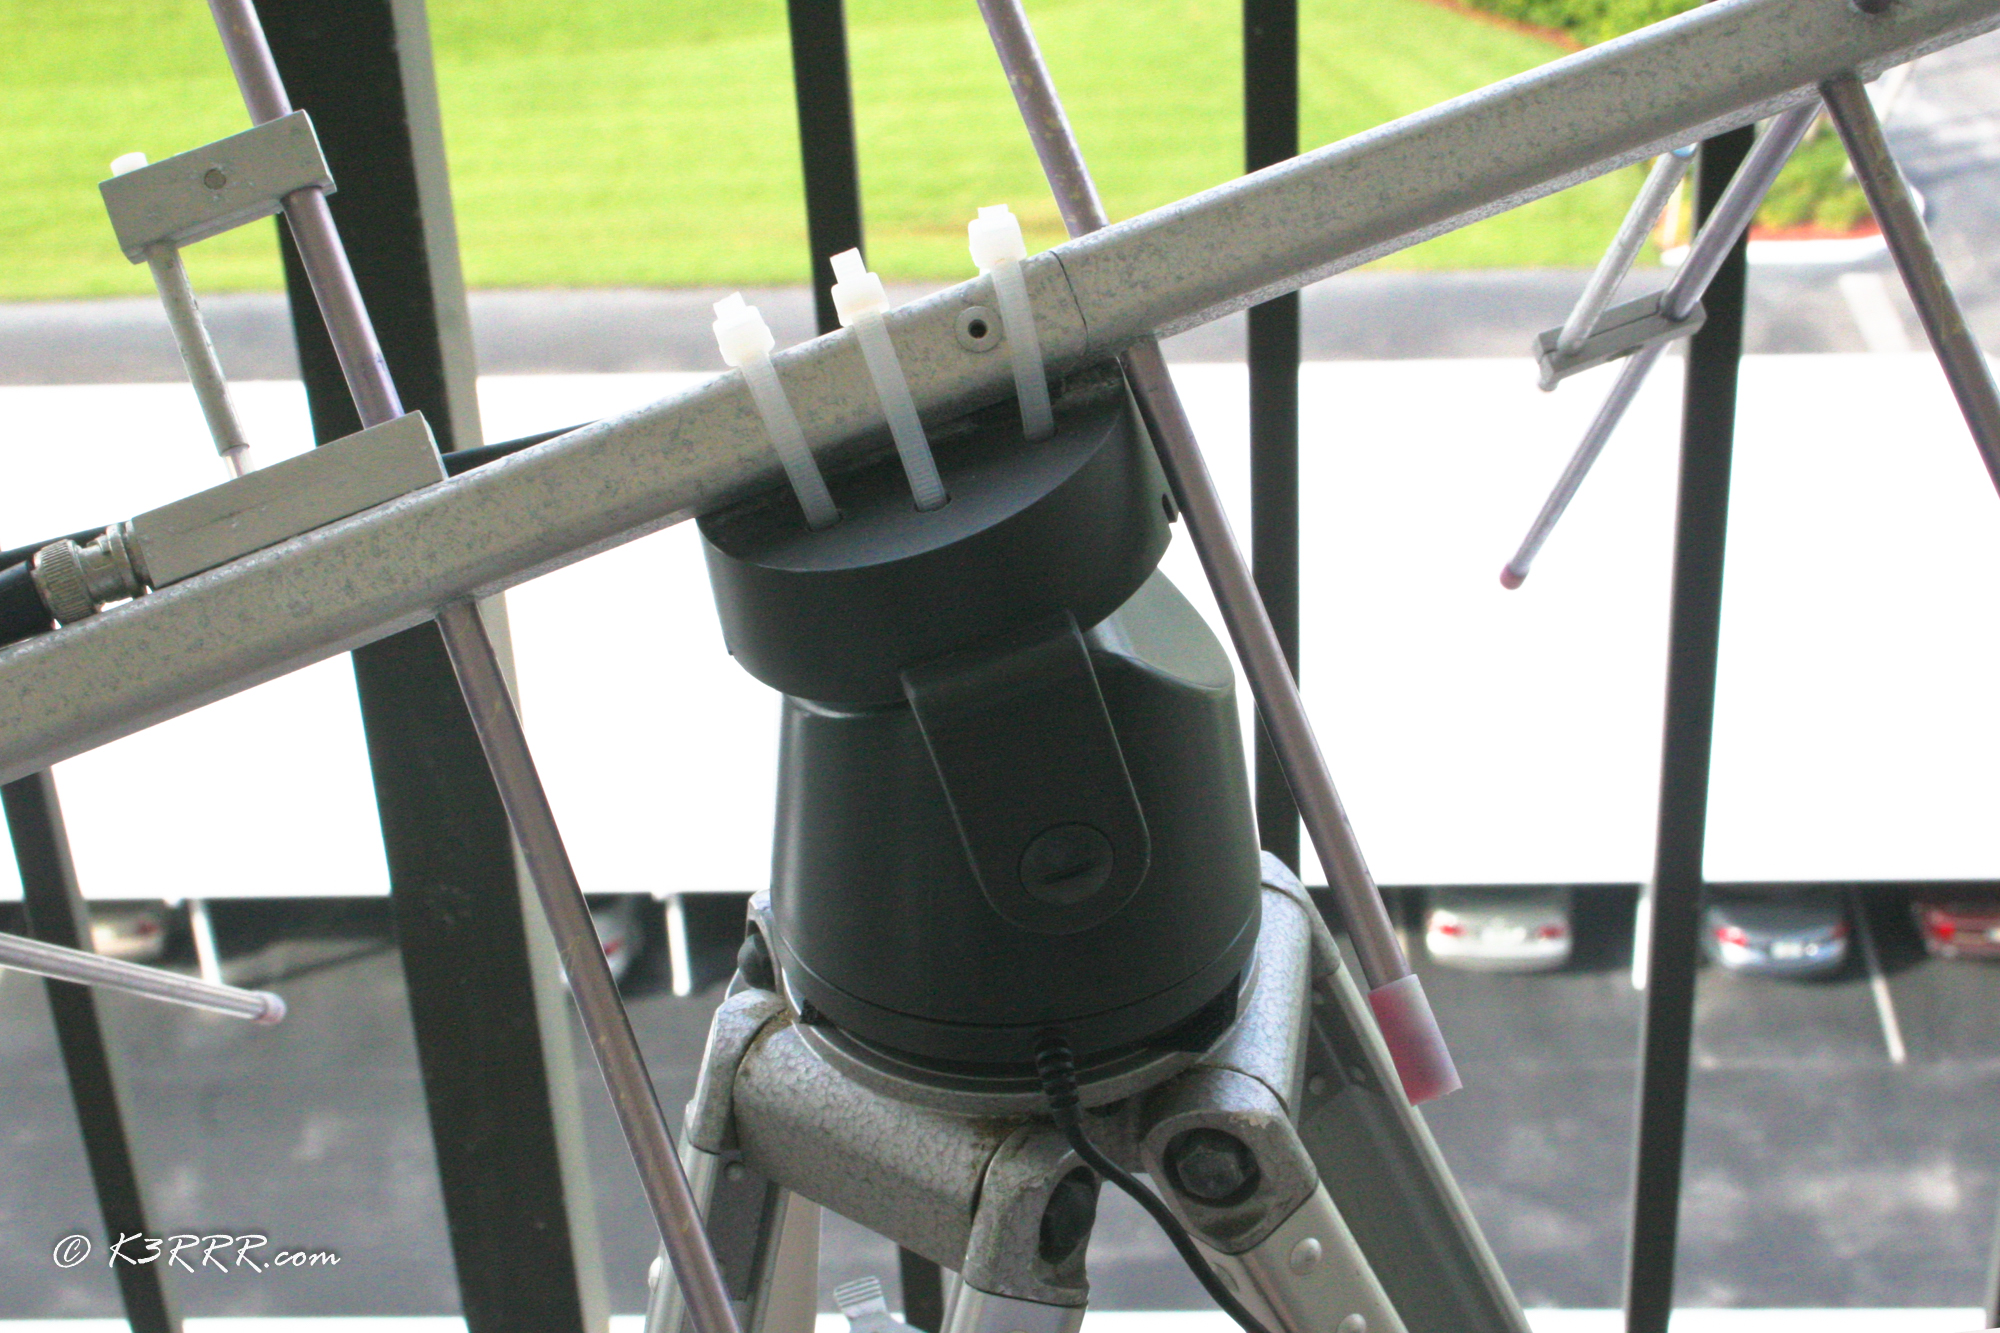
- Three plastic wire wraps. Fortunately, the top plastic part of the Ninja pops off easily. Having both the construction skills and the patience of an eight year old, I simply drilled three sets of holes in the plastic top….laid the antenna on top at the balance point and strapped it down. The other good part about this is that if I need to take the thing apart for the hurricane du jour, I pop off the top, disconnect the coax and carry the antenna and the tripod inside. Cost of three wire wraps: under $1.
- A BNC barrel connector. The Arrow II comes with a male BNC so I use this barrel connector to connect my 30′ run of LMR-195. Cost of barrel connector: $2.
- Total cost of “tower” and rotor system, not counting Arrow II or LMR-195: $48.
- Total cost of entire satellite antenna system: Under $250. Being able to work the birds again, even as a cliff dweller: Priceless!
With the above setup, I can sit in my shack, use my Ham Radio Deluxe tracking software module and use the remote to guesstimate both AZ and EL. I have now added two Advanced Receiver preamps: SP432VDG for 435 MHz and SP144VDG for 144 MHz – both of which greatly improve the reception for most satellite passes and compensate for the low gain of the Arrow II and the LMR-195 feedline loss. The two preamps doubled the cost of the whole set up to about $500 but, for me, was worth it.
Challenges for the Technically Competent
Challenges for those of you who are not a techno-weenie like me:
- You can probably dissect the Ninja and adjust what is necessary to give you near 360 degree AZ and 90 degree EL. If you are a
 cliff dweller like me, it won’t do you any good…but for the rest of you, you could work the whole horizon to horizon pass!
- The X-10 system IS software programmable and someone brighter than me could figure out how to software interface standard X-10 hardware with Ham Radio Deluxe and other satellite tracking software. Now, THAT would be super kewl.
Expansion Plans
Item 743 on the To Do List, includes:
- Running separate feedlines to the Arrow with one going to my FT-817ND for receive and the other going to my FT-897D for transmit. This will allow me to run full duplex on the birds which neither of the rigs will do by themselves (full duplex lets you hear your own signal off the bird so you know where in the Hertz you are and how strong your signal is compared to others. Also, by running two feedlines, I will bypass the duplexer in the Arrow II allowing me to go 50 watts on 2 and 20 watts on 70 cm to help compensate for the lower ERP of the antenna.

Currently, I am on To Do List Action Item 12 – so, it is currently unclear when I will get to Item 743!
Suggestions Welcome!
I hope this plants some seeds of thought and is helpful to others wanting to work the LEO birds…even if you are a fellow cliff dweller.
73 / 72,

K3RRR
-.- …– .-. .-. .-.
73 de Robert K3RRR
http://K3RRR.com
@K3TripleR
http://YouTube.com/user/K3RRR
-.- …– .-. .-. .-.
PS: Note: If you have a couple of hundred dollars to spend on your rotator system instead of just $50, I highly recommend you take a look at my Computer Controlled Attic Antenna System – this works even better on balconies and backyards also – and it is much more durable than El Cheapo AND computer-controlled!
PS: Dr. Jerry Johnson – K0CQ, has given us the answer to our 45 degree polarization issue from above. This was what he wrote me (used with his permission):
“On your web page about your AZ EL mount, you ask about the loss for linear polarization when 45 degrees off. Its 3 dB.Signal strength is proportional to the cosine of the error angle. Cosine of 45 degrees is 0.7071, exactly 3 dB. Cosine of 0 is 1.0. Cosine of 90 is 0.
I had a 2m beam with polarization rotor at one time. I could notch the local repeater at least 40 dB when heading the antenna for horizontal polarization. But a 10 degree error loses just a fraction of a dB while making the cross polarized signals only 10 dB down from matched polarization which can be a useful compromise.
73, Jerry, K0CQ“
Thanks Jerry!
Jerry, I bought one of these Ninja pan and tilt off of ebay. When it arrived I plugged it in, put batteries in the remote and made sure the house setting was the same. However, it didn’t work. Is there some trick to get this thing to work, or do I just have a defective one? Royce KC8NMG
Enjoyed the comment on being technically competent regarding latching up a rotor and transceiver to the HRSDeluxe software system. I’m using a FT-991A transceiver and a G-450 rotor with the new controller from MFJ that has been designed to specifically interface to the software. The task ahead looks to be a major set of problems to pull all that together plus setting up the tracking system and on and on. Have you seen and real people manual to make this all happen IR a YouTube presentation or series of same that would aid the technical incompetent?
W3VAR
Hi and thanks for this page. I got the Ninja…have yet to actually use it 🙁 But I just wanted to let you know that Arrow has changed their URL, so the link on this page no longer works. There is a smilar antenna at this URL
http://www.arrowantennas.com/arrowii/146-437.html
although this antenna has elements in two planes, so it would be harder to strap it to the moving platform on the Ninja.
The Elk antenna is a bit more, but seems to be single-plane and still available:
http://www.elkantennas.com/2m4405element.htm
73 de W2BFJ